How to Export Your Lovable Project to GitHub: Complete 2026 Guide (With Screenshots)
Building with Lovable is one of the fastest ways to get a working app up and running. But at some point, you need your code in GitHub — whether that's for version control, collaboration, or continuing development in editors like Cursor, VS Code, or Windsurf.
This guide covers every method to export your Lovable project to GitHub, including the built-in integration, manual ZIP downloads, and what to do once your code is in a repository. We also cover common issues people run into and how to fix them.
Related resources you might find useful:
- Is Lovable SEO-Friendly? What You Need to Know
- DIY Lovable SEO Tips That You Can Do Without Code
- How to Convert Your Lovable Site to HTML for Better SEO
Prerequisites
Before you begin, you need:
- A Lovable project open in your browser
- A GitHub account (free accounts work fine) with permission to create repositories
- Git installed locally if you plan to clone and work on the code after export
If you don't have a GitHub account yet, sign up here — it takes about two minutes.
Method 1: Use Lovable's Built-In GitHub Integration (Recommended)
The fastest and cleanest way to export your Lovable project to GitHub is using the native integration. Lovable will create a repository for you and keep it in sync automatically.
Step 1: Open the GitHub Integration Panel
Open the project you want to export in Lovable. In the top bar of the editor, look for the GitHub icon, or open the Settings panel and navigate to Integrations or GitHub.
You'll find the button in one of two places:
Option A — Top bar GitHub icon:
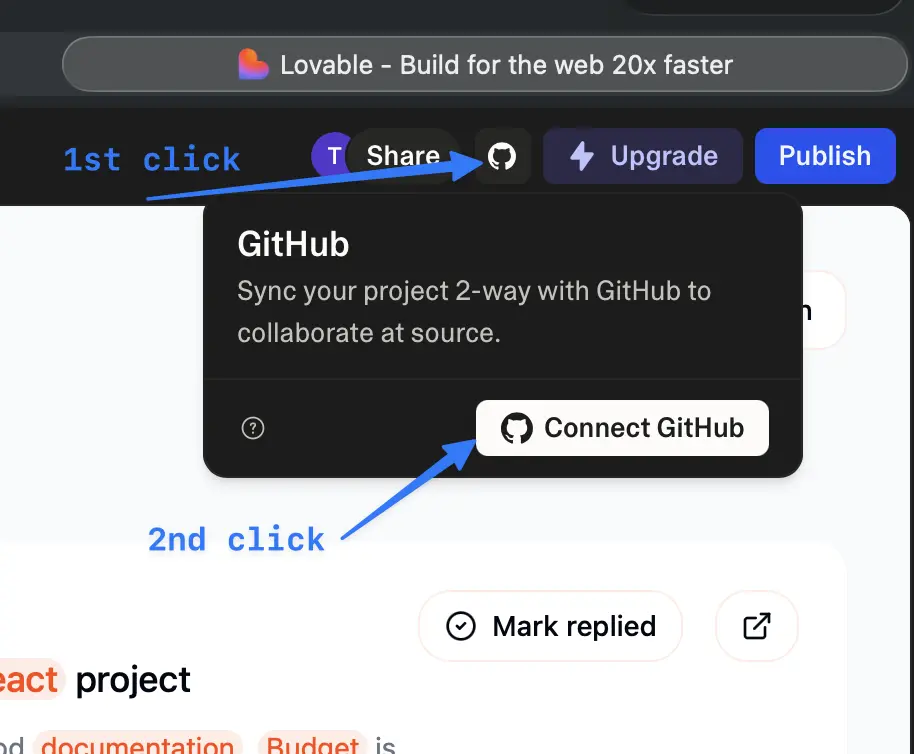
Option B — Settings panel:
Step 2: Authorize Lovable to Access Your GitHub Account
Once you click Connect GitHub, a GitHub authorization page opens in a new tab. Here you choose which GitHub account or organization Lovable should connect to, and confirm the permissions it needs to create and push to repositories on your behalf.
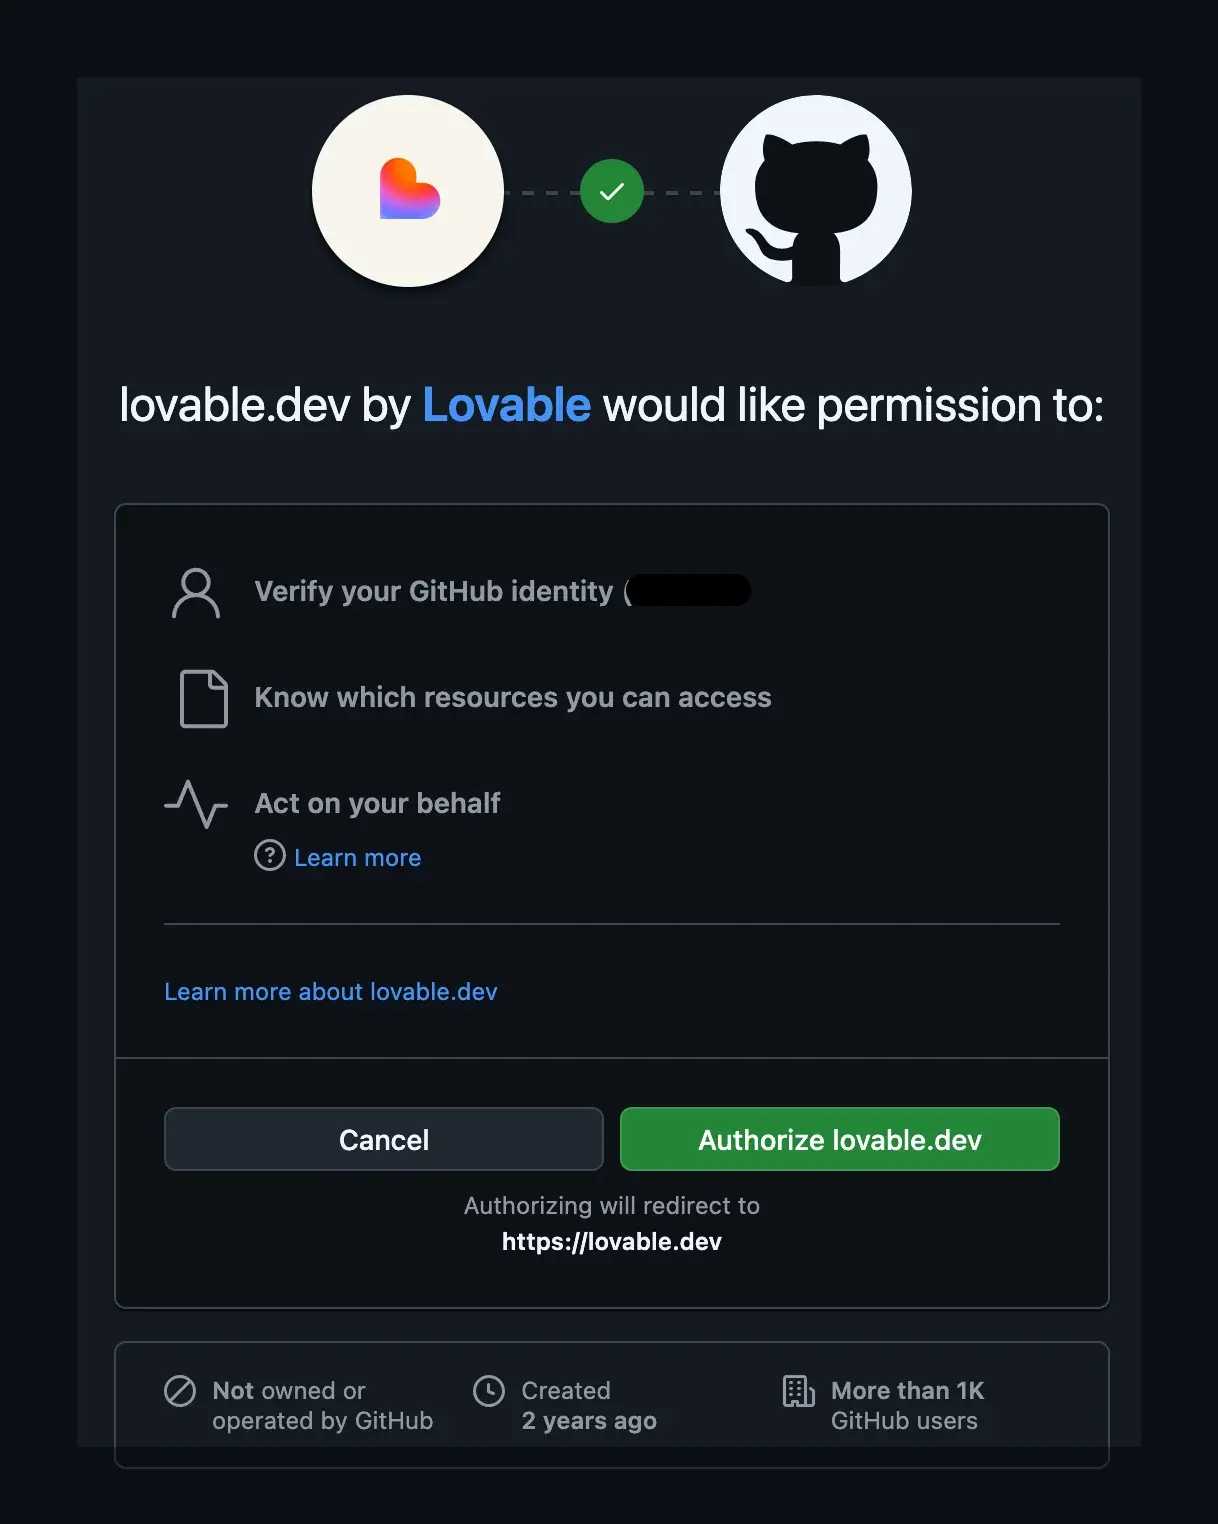
Lovable requests write access to repositories so it can create new repos and push commits. If you're using a GitHub organization, make sure you have admin permissions on that org, or ask an admin to approve the OAuth app.
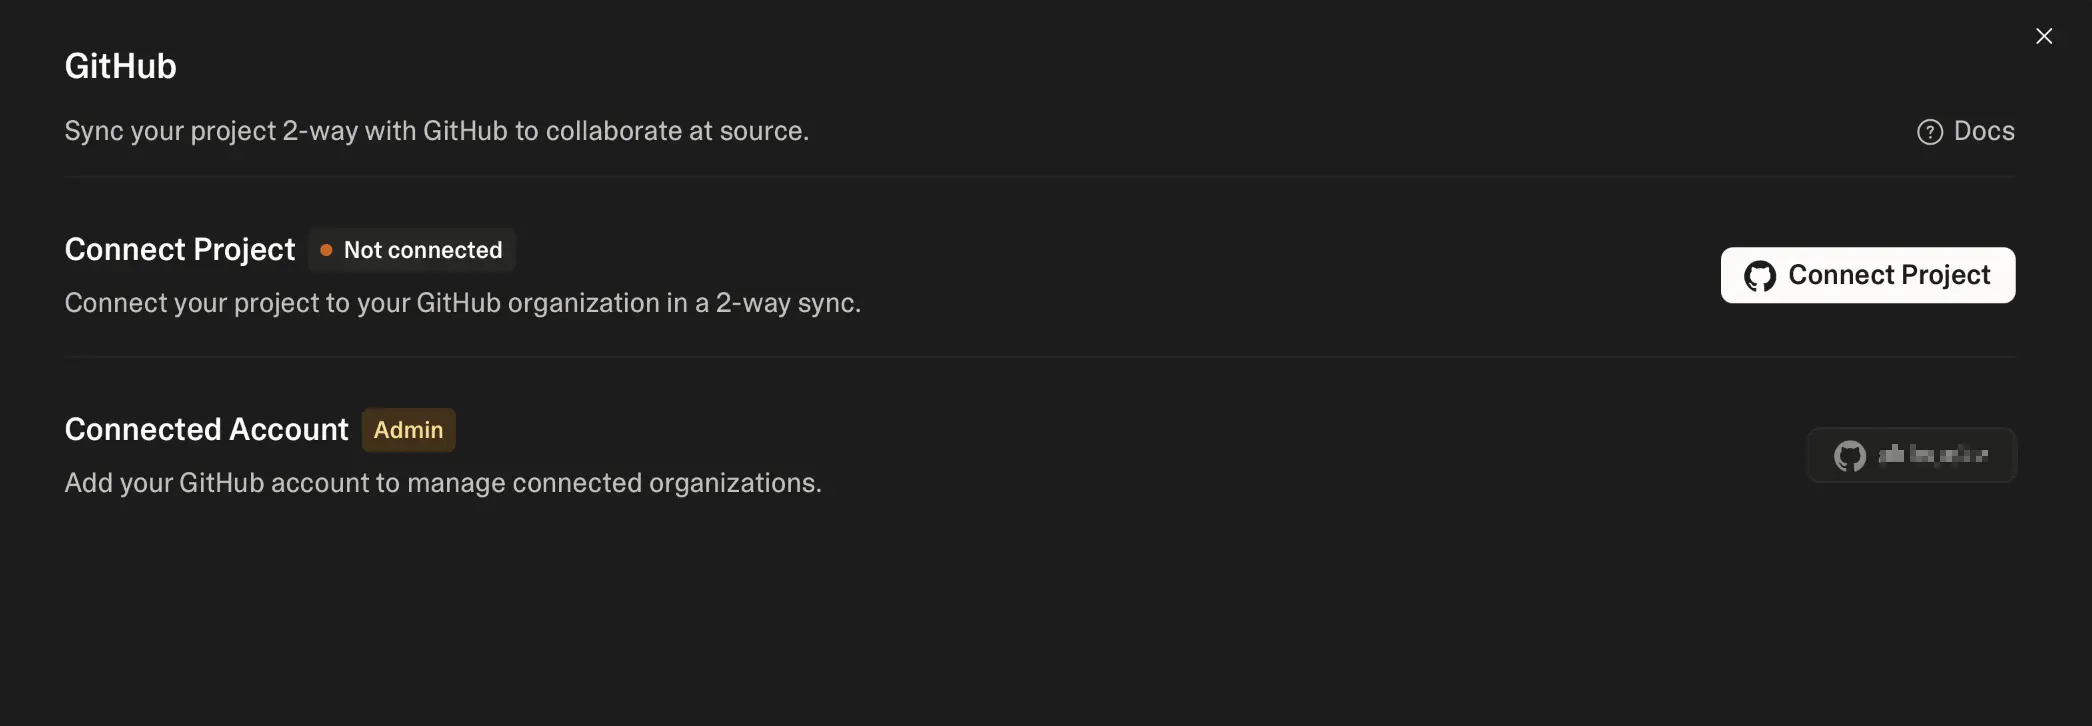
Step 3: Create or Connect a Repository
After authorization, Lovable creates a repository and sets up two-way sync. You should see something like this:
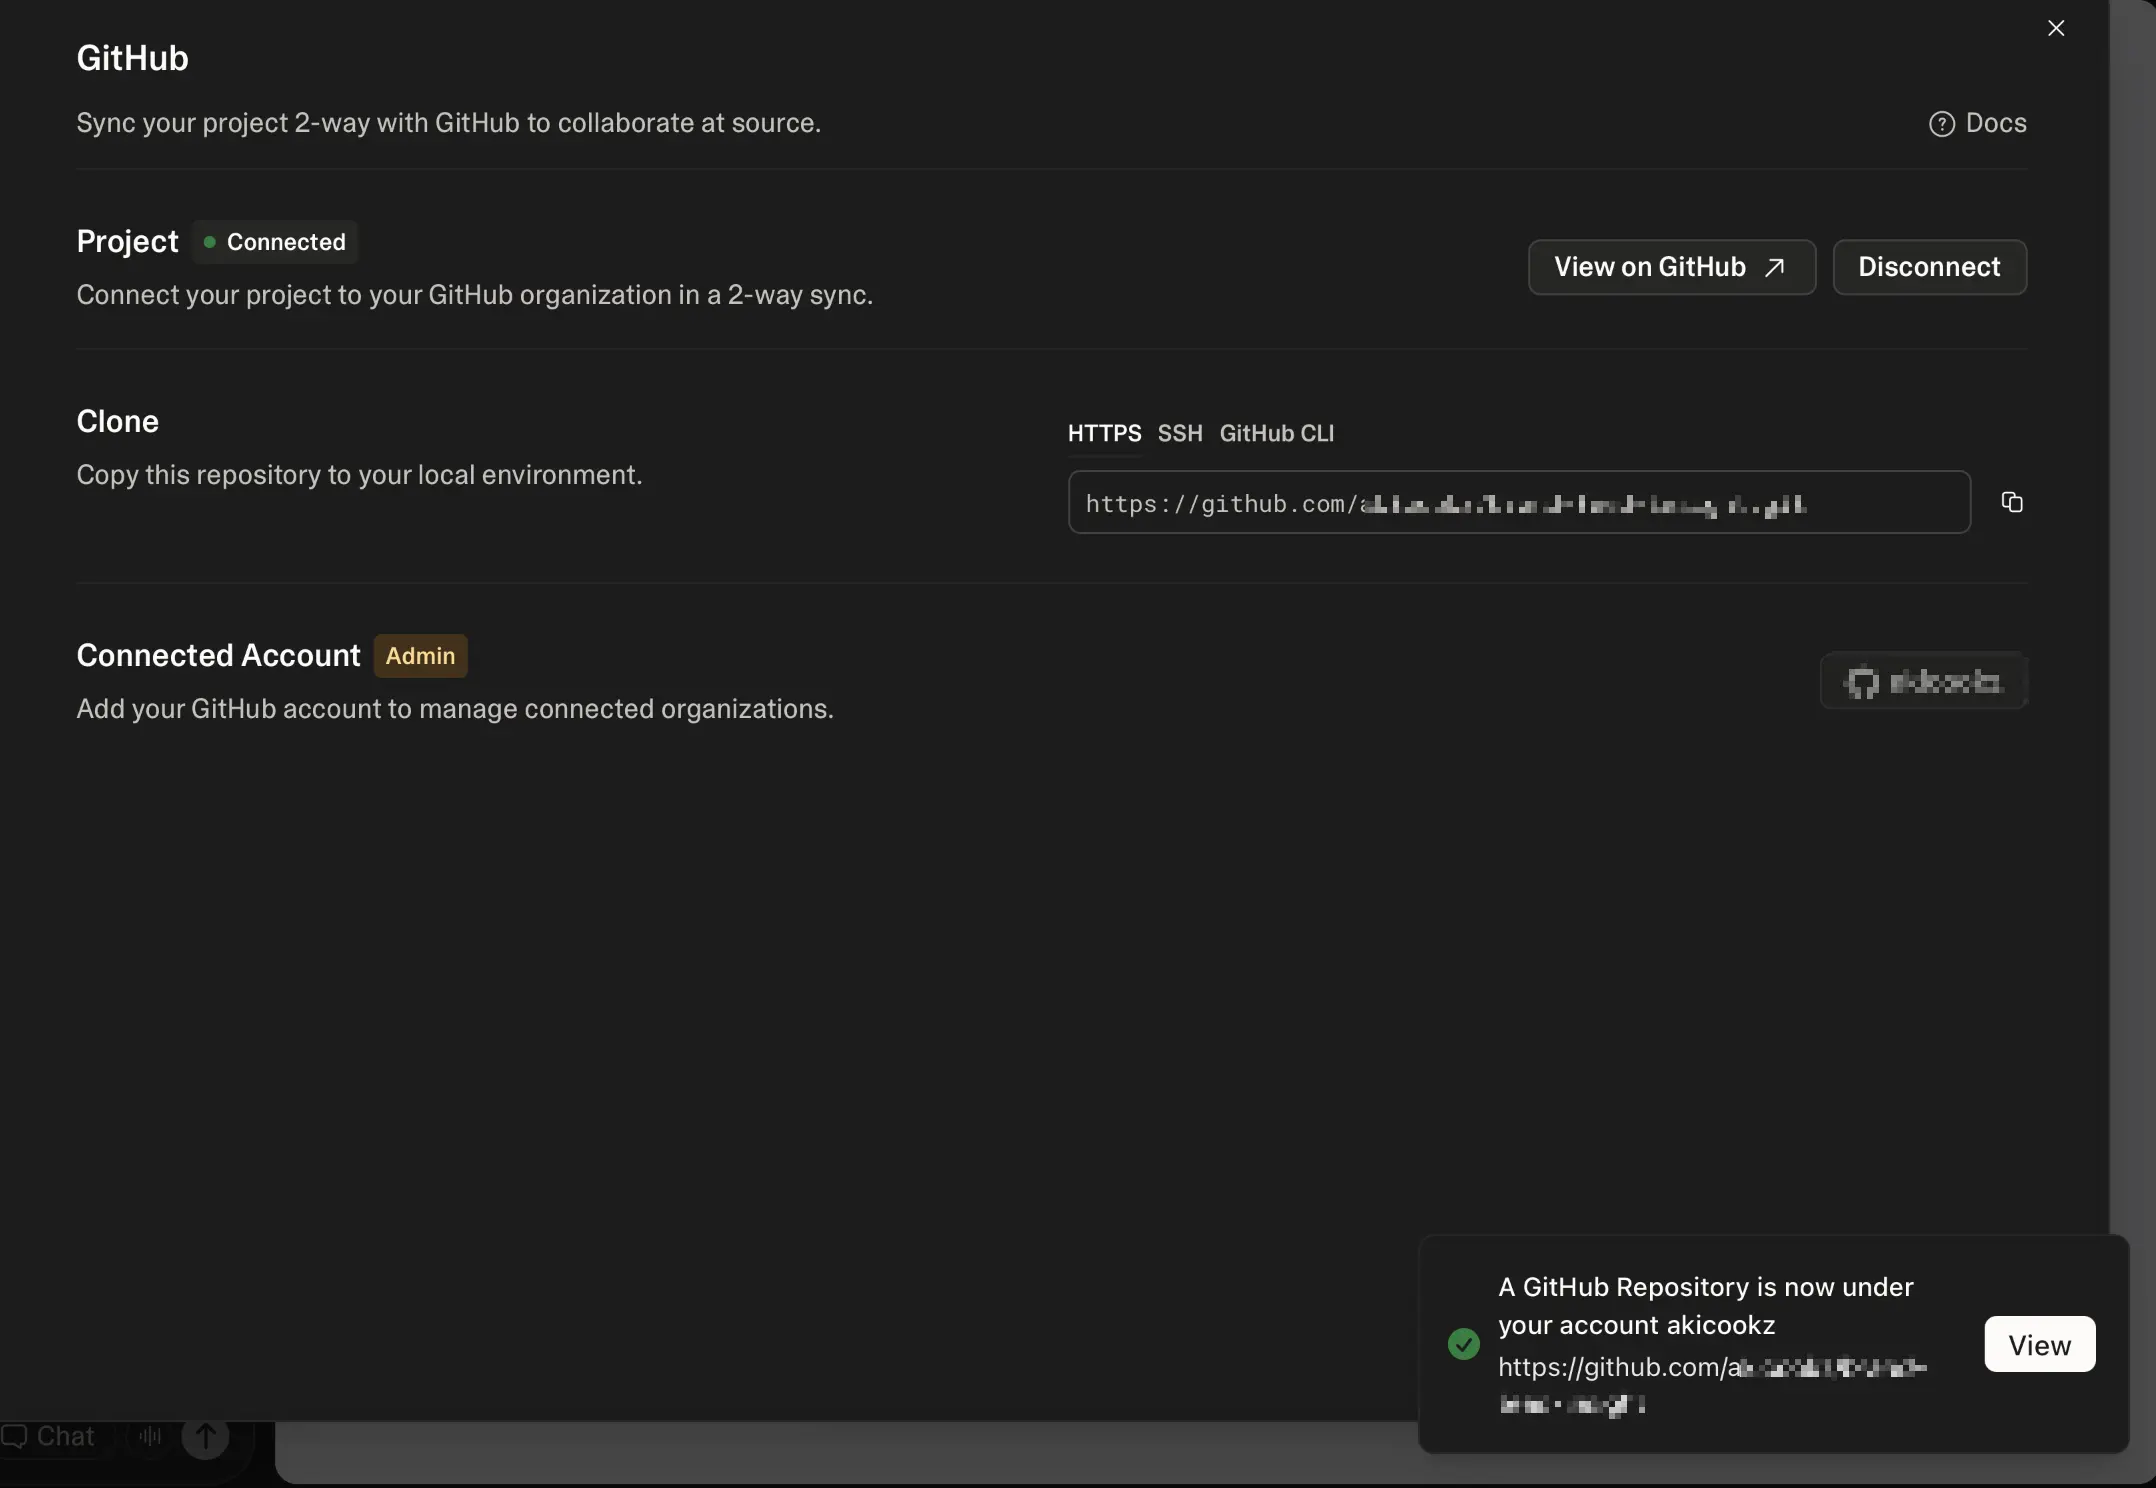
At this point, Lovable has:
- Created a
mainbranch linked to your project - Enabled auto-sync so changes you make in the Lovable editor are automatically pushed to GitHub
- Given you the option to create additional branches from this same panel
Every time you make a change in Lovable and it saves successfully, the updated code is pushed to your connected GitHub repository. You don't need to manually trigger this.
Step 4: Verify the Sync Is Working
Go to your GitHub repository URL (it will look like https://github.com/yourusername/your-repo-name) and check:
- The latest commit timestamp matches your most recent Lovable edit
- Your project files are all present (src folder, package.json, vite.config.ts, etc.)
- The
mainbranch shows your current project state
If you see recent commits from Lovable, the sync is working correctly.
Method 2: Download Your Project as a ZIP File
If you prefer not to connect GitHub directly, or if you want a one-time snapshot of your code, you can download the project as a ZIP file.
Step 1: Open the Code Panel
With your project open in Lovable, click the Code button at the top left of the preview panel. This opens the file explorer showing your project structure.
Step 2: Download the Codebase
If you're on the Business plan, you'll see a Download codebase button with a download arrow icon at the bottom of the file explorer. Click it and your entire codebase downloads as a ZIP file.
Note: This feature requires a Business plan. If you're on a free or lower-tier plan, you'll need to use Method 1 (GitHub integration) or copy files manually from the code viewer.
Step 3: Push to GitHub Manually
Once you have the ZIP file, you can create a GitHub repository and push the code manually:
# Unzip the downloaded fileunzip your-lovable-project.zipcd your-lovable-project# Initialize a git repositorygit initgit add .git commit -m "Initial commit from Lovable export"# Create a repo on GitHub, then pushgit remote add origin https://github.com/yourusername/your-repo-name.gitgit branch -M maingit push -u origin main
This gives you a clean starting point in GitHub, but unlike Method 1, changes you make in Lovable won't sync automatically.
What to Do After Exporting
Once your code is in GitHub, you have several options for continuing development.
Clone and Develop Locally
git clone https://github.com/yourusername/your-repo-name.gitcd your-repo-namenpm installnpm run dev
This starts a local development server. You can now edit your code in VS Code, Cursor, or any editor you prefer.
Set Up GitHub Actions for Deployment
If you want to deploy your app outside of Lovable's hosting, you can set up CI/CD with GitHub Actions. Common deployment targets include Vercel, Netlify, and Cloudflare Pages — all of which can connect directly to your GitHub repository and deploy on every push.
Continue Using Lovable's Editor
If you used Method 1 (built-in integration), you can keep using Lovable to make changes. The two-way sync means you can work in Lovable for quick edits and in your local editor for more complex changes. Just be mindful of merge conflicts if you're pushing changes from both directions.
Troubleshooting Common Export Issues
"GitHub integration isn't showing up"
Make sure you're looking in the right place. The GitHub icon may be in the top bar or inside the Settings panel under Integrations. If you still don't see it, try refreshing the page or logging out and back in.
"Authorization failed"
If the GitHub OAuth flow fails, check that you don't have a browser extension blocking popups. Also verify you're logged into the correct GitHub account. If you're trying to connect to an organization, ensure you have admin permissions.
"Sync seems stuck or behind"
Auto-sync sometimes has a short delay. If you've made changes in Lovable but don't see them in GitHub after a few minutes, try making a small edit (like adding a comment) and saving again. This usually triggers a fresh push.
"My project files are missing from the repo"
Check if Lovable created the repo with the correct branch. Some users find their code is on a different branch than main. Check all branches in your GitHub repository.
"I exported to GitHub but my site isn't ranking on Google"
Exporting to GitHub gives you version control and development flexibility, but it doesn't fix SEO by itself. Lovable builds React Single Page Applications (SPAs), which have inherent crawlability limitations regardless of where the code lives.
If your goal is to fix SEO, you need a pre-rendering solution that serves static HTML to search engine crawlers while keeping the SPA experience for visitors. Read our guide on converting Lovable to HTML for SEO to understand the options.
FAQ
Can I export a Lovable project to GitHub on the free plan?
Yes. The built-in GitHub integration (Method 1) is available on all Lovable plans, including the free tier. The ZIP download option (Method 2) requires a Business plan.
Does exporting to GitHub break my Lovable project?
No. Connecting to GitHub via the built-in integration keeps your Lovable project fully functional. You can continue editing in Lovable as usual, and changes sync to GitHub automatically.
Can I use Lovable and a local editor at the same time?
Yes, but be careful about merge conflicts. If you push changes from your local editor to the same branch Lovable is syncing to, you may need to resolve conflicts manually.
Will exporting to GitHub help my SEO?
Not directly. Exporting to GitHub moves your code to a repository — it doesn't change how your site is rendered. Since Lovable builds SPAs, search engine crawlers still see an empty <div id="root"></div> instead of your content. For SEO improvements, look into prerendering solutions or converting to HTML.
Can I migrate my exported Lovable code to Next.js?
Yes, though it requires significant development work. Your React components can be ported to Next.js, but you'll need to reconfigure routing, data fetching, and build pipelines. After migration, the Lovable editor will no longer work with your codebase.
What happens if I disconnect GitHub from Lovable?
Your existing GitHub repository and all its commits remain intact. You simply lose the automatic sync. You can reconnect at any time.
Summary
You now know how to export your Lovable project to GitHub using either the built-in integration or a manual ZIP download. The built-in integration is recommended for most users because it keeps your code in sync automatically and doesn't require any command-line knowledge.
Once your code is in GitHub, you can clone it locally, set up deployment pipelines, and collaborate with other developers — while still using Lovable's editor for quick changes.